The fastest and easiest way to synchronize Outlook and your Android device is via Wi-Fi. Although, synchronization can also be performed through other connection means like a USB cable, Bluetooth, cellular networks and portable Wi-Fi hotspot.
If for some reason you are unable to use a Wi-Fi connection, consider using one of the above mentioned methods. We are going to take a closer look at every one of them.
Synchronization over USB Cable
1. Connect your Android device to a PC
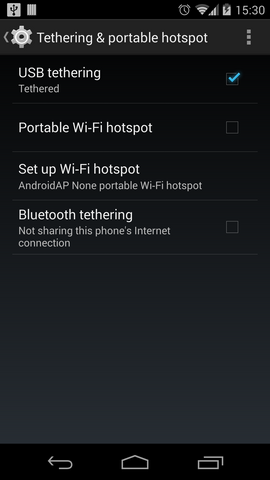
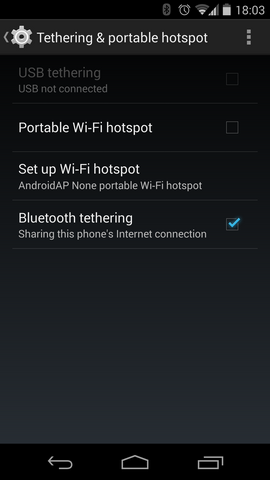
2. Go to the system settings on your phone or tablet, tap on the Tethering & portable hotspot menu option (usually located in the Wireless and networks section) and enable USB Tethering
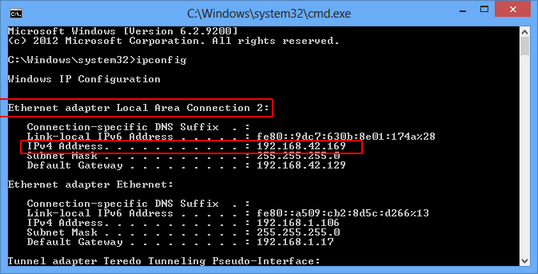
3. On your PC click Start, type cmd and press enter (for Windows XP users click Start, click Run, type cmd and press enter)
4. In the opened window type ipconfig and hit enter. Note the IP address (IPv4 Address) that is listed under the Ethernet adapter Local Area Connection heading
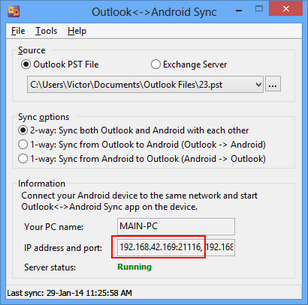
5. Now start Windows version of Outlook-Android Sync. You should be able to see the IP address you noted earlier in the IP address and port field
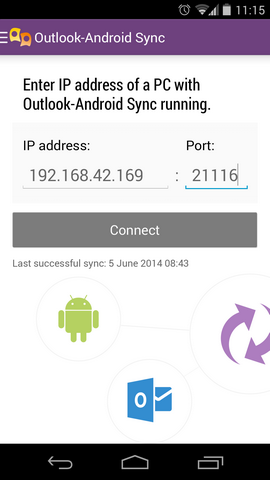
6. Return to Android version of Outlook-Android Sync and tap on Menu -> Connect manually
7. Enter the IP address, change the port number (if needed) and click on Connect
8. Synchronization should start
Synchronization over cellular networks (3G, LTE)
First, you should know the external IP address of your PC. Let’s take a look at how to find it.
1. Visit a search engine like Google and search for: what’s my ip
2. The first result you get should be a site called What Is My IP, click on it
3. Your external IP address will be displayed on the resulting page. Note it
If you’re connected to the Internet through a router, you need to go to its settings and set up the port forwarding feature so that all external requests to the TCP/UDP port number 21114 (default Outlook-Android Sync port) are redirected to your PCs IP address. Please consult with your router’s documentation about how to do that or contact our customer support team.
Next step is to ensure that your firewall allows Windows version of Outlook-Android Sync to accept inbound traffic from the Internet. If you use Windows Firewall:
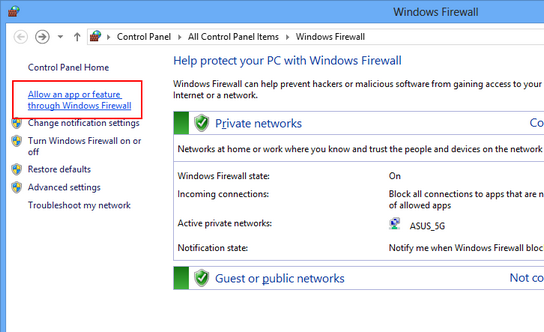
1. Click on Control Panel -> Windows Firewall
2. Click on the Allow an app or a feature through Windows Firewall link on the left
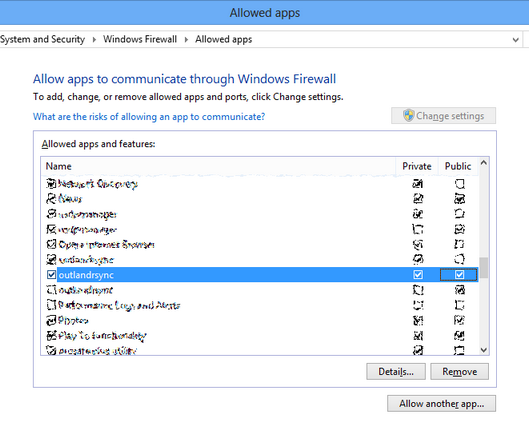
3. Make sure both checkboxes for Private and Public columns are selected for outlandrsync (Outlook-Android Sync)
If you use any other firewall software, please consult with its documentation.
All preparations are done, please return to Android version of Outlook-Android Sync and tap on Menu -> Connect manually. Enter the external IP address you noted earlier, change the port number (if needed) and click on Connect. Synchronization should start.
Synchronization over portable Wi-Fi hotspot
When this option is used, a private Wi-Fi network will be created in between your PC and the Android device. In this case your phone or tablet acts as a router and PC connects to it as a client.
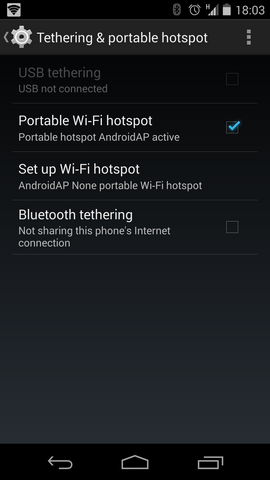
1. Go to the system settings on your phone or tablet, tap on the Tethering & portable hotspot menu option (usually located in the Wireless and networks section) and enable Portable Wi-Fi hotspot (in some cases Android will ask you to configure the hotspot, please follow the on-screen instructions)
2. On your PC or laptop, select your handset's network from the list of Wi-Fi connections available and connect to it
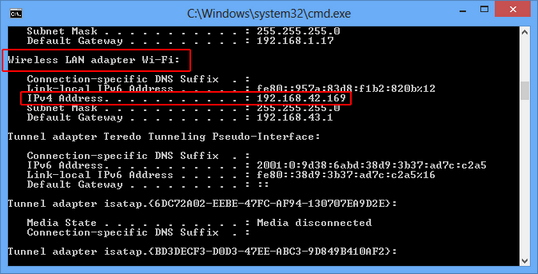
3. Click Start, type cmd and press enter (for Windows XP users click Start, click Run, type cmd and press enter)
4. In the opened window type ipconfig and hit enter. Note the IP address (IPv4 Address) that is listed under the Wireless LAN adapter Wi-Fi heading
5. Now start Windows version of Outlook-Android Sync. You should be able to see the IP address you noted earlier in the IP address and port field
6. Return to Android version of Outlook-Android Sync and tap on Menu -> Connect manually
7. Enter the IP address, change the port number (if needed) and click on Connect
8. Synchronization should start
Synchronization over Bluetooth
1. Go to the system settings on your phone or tablet, tap on the Tethering & portable hotspot menu option (usually located in the Wireless and networks section) and enable Bluetooth tethering
2. Enable Bluetooth on your PC and set your Android device to be discoverable
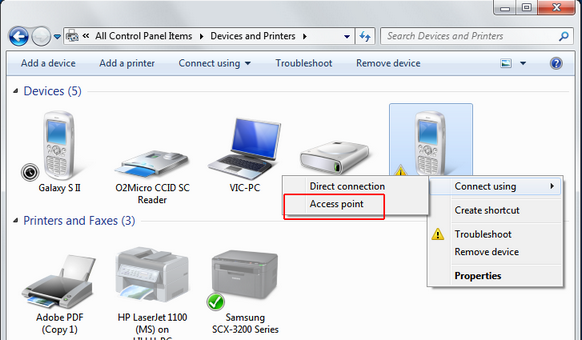
3. Click on Control Panel -> Devices & Printers and use the Add a Device button to add your phone or tablet and pair it with your PC
4. Once the devices are paired, right-click your phone and select Access Point
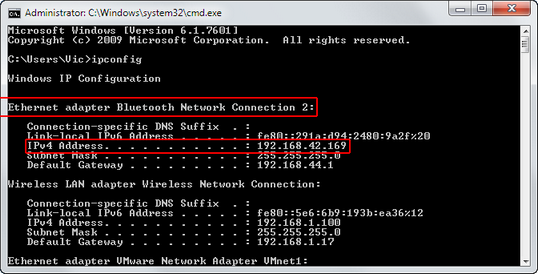
5. Click Start, type cmd and press enter (for Windows XP users click Start, click Run, type cmd and press enter)
6. In the opened window type ipconfig and hit enter. Note the IP address (IPv4 Address) that is listed under the Ethernet adapter Bluetooth Network Connection heading
7. Now start Windows version of Outlook-Android Sync. You should be able to see the IP address you noted earlier in the IP address and port field
8. Return to Android version of Outlook-Android Sync and tap on Menu -> Connect manually
9. Enter the IP address, change the port number (if needed) and click on Connect
10. Synchronization should start